FREE SHIPPING!
Due to high demand, capsule orders may take 1-2 days to process!
SAME DAY SHIPPING (up to 2pm CST)
New customers save 10% off with code WELCOME10
Due to high demand, capsule orders may take 1-2 days before shipment
All orders ship free (orders $20 or more get upgraded to USPS priority Mail)
All orders ship free (orders $20 or more get upgraded to USPS priority Mail)
All orders ship free (orders $20 or more get upgraded to USPS priority Mail)
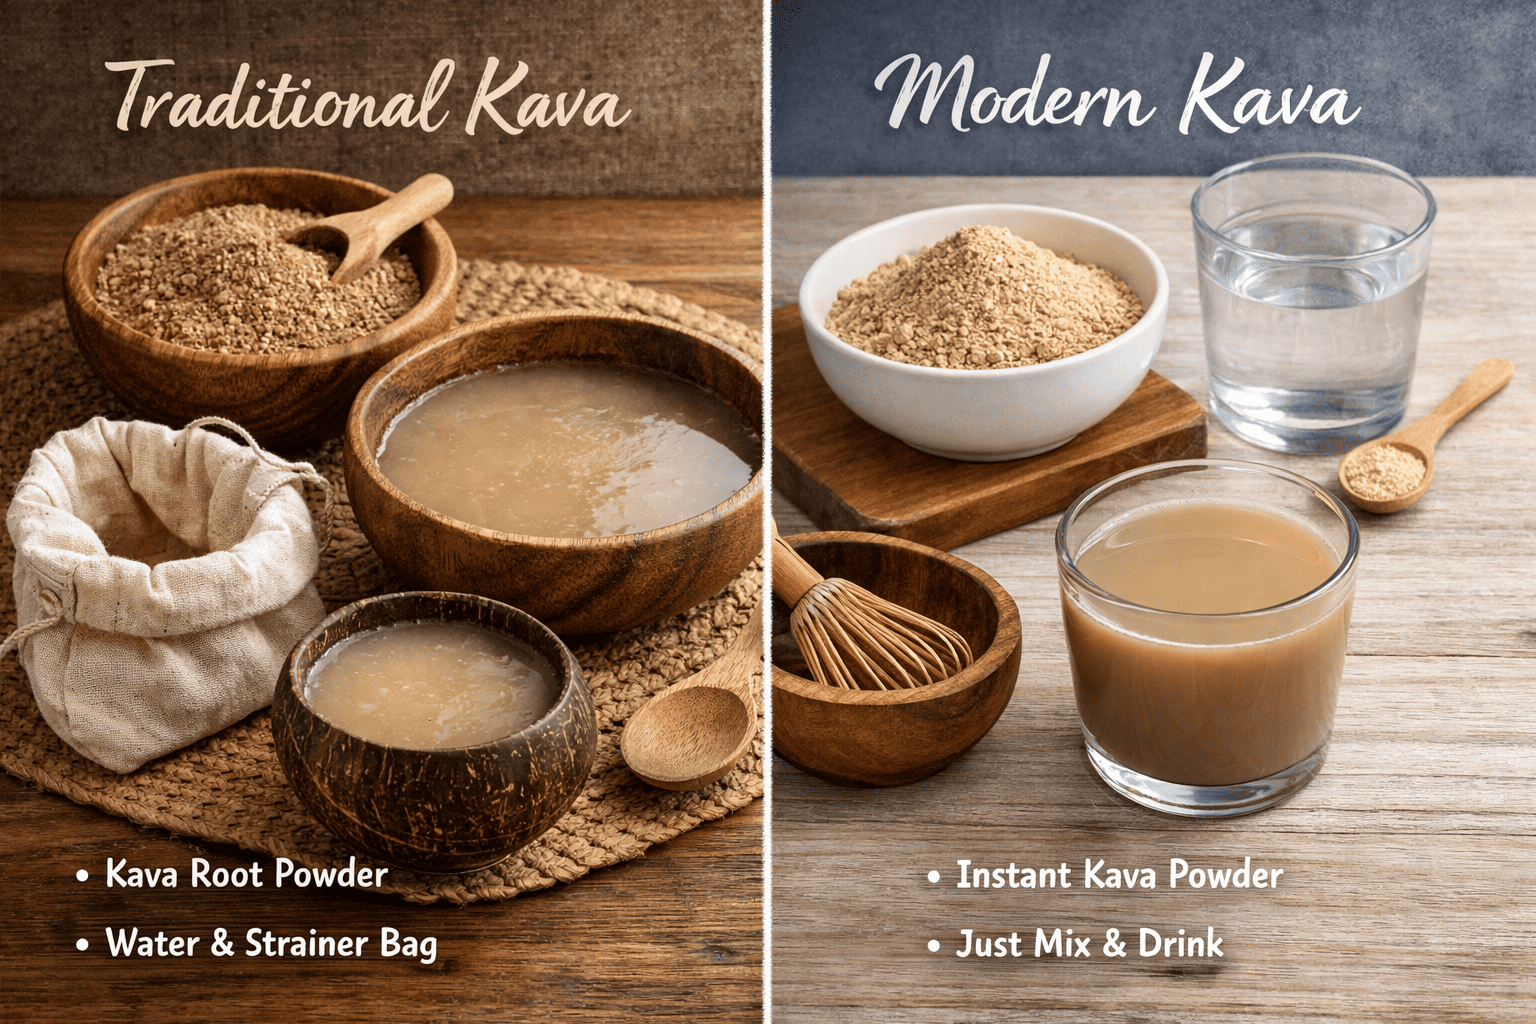
Kava is made by mixing ground Kava root powder with water and manually kneading it to release its naturally occurring Kavalactones before straining. That’s the traditional way. Today, there are also instant, ready-to-mix options that make preparing Kava even faster at home.
Whether you’re learning how to make Kava for the first time or refining your method, it all starts with good powder and the right tools.
Let’s break it down step by step so you can prepare Kava the right way from start to finish.
To make Kava using the traditional method, you need medium-grind Kava root powder, lukewarm water, a strainer bag, and a bowl for kneading. It doesn’t require complicated equipment, but each item plays an important role in achieving the right texture and consistency.
For Traditional Kava
Noble Kava Root Powder (Medium-Grind): The standard choice for traditional preparation, this medium grind is designed for soaking and kneading before straining.
Water (Room Temperature or Lukewarm): Slightly warm water (around 100–120°F) works best.
Strainer Bag (75–100 Micron): A proper Kava strainer bag is ideal. You can also use a nut milk bag, cheesecloth, or a clean cotton cloth to separate the liquid from the woody fibers.
Large Bowl: Needed to soak and knead the Kava powder thoroughly before straining.
Coconut Milk or Almond Milk (Optional): A small amount, mixed with water, can help make the Kava drink richer.
Pro Tip:Medium-grind Kava is preferred for traditional preparation because it allows proper extraction during kneading while still being easy to strain. Finer powders can pass through the strainer and make the drink gritty, while coarse cuts may not release enough of the root’s natural compounds.
If You’re Using Instant Or Micronized Kava
For a faster approach, Instant or Micronized Kava skips the traditional kneading method. All you’ll need is:
Instant or Micronized Kava Powder: Designed to dissolve directly in water, so no straining is required.
Water (Cool or Room Temperature): Simply mix and stir until fully blended.
Traditional Kava preparation involves placing medium-grind Kava root into a cloth strainer bag, submerging it in water, and kneading it for about 10–15 minutes to release its natural compounds.
The result is a cloudy, muddy-colored drink made the way it has been for generations. If you’re learning how to make Kava Kava properly, start here.
Step 1: Measure Kava: Start by scooping your Kava root powder into a strainer bag.
Step 2: Soak: Place the bag in a bowl and pour in cool to lukewarm water. Let it sit briefly so the powder hydrates before you start working it.
Step 3: Knead and Squeeze: With clean hands, knead the bag under water, as if you’re gently kneading dough. Squeeze as you go so the liquid turns cloudy and tan.
Step 4: Wring Out: Once the water looks fully infused, twist and wring the bag firmly to push out as much liquid as possible.
Step 5: Final Strain: If you want a smoother cup, pour the drink through a fine strainer or cheesecloth to catch any extra grit.
Step 6: Serve: Pour into a cup or traditional bowl and drink it fresh. Stir before each pour if it settles.
Step 7: Respect the Tradition: Keep it simple, take your time kneading, and treat the process as part of the experience, not just a shortcut to a drink.
Note:The kneading process helps release Kavalactones, the natural compounds found in Kava root that give the drink its characteristic effects and cloudy appearance.
How To Prepare Instant Kava
To prepare instant Kava, add instant Kava to a glass, pour in cold water, and stir until fully mixed. That’s the basic formula for how to make Kava drink quickly at home. It’s the easiest route and a great starting point if making Kava feels new.
Here’s a step-by-step guide:
Step 1: Add water (200-250ml per serving): Pour cool or room-temperature water into a cup or shaker bottle.
Step 2: Mix in instant Kava: Add your instant Kava powder and stir well, or shake for 10–15 seconds until it looks evenly blended.
Step 3: Let it sit briefly: Give it 30–60 seconds so any foam settles and the texture smooths out.
Step 4: Sip and adjust: Take a small sip, then add a bit more water if you want it lighter, or more instant Kava if you want it stronger.
Step 5: No straining needed: Once it’s mixed, it’s ready to drink, no bag, no bowl, no cleanup mess.
If you’re deciding between traditional preparation and instant powder, here’s a simple side-by-side breakdown:
Feature
Traditional Kava
Instant / Micronized Kava
Time Required
10–15 minutes (kneading + straining)
1–2 minutes (stir and drink)
Straining Needed
Yes, requires a strainer bag
No straining required
Texture
Cloudy, earthy, slightly gritty
Smoother and more uniform
Control Over Strength
High — adjust water and kneading time
Moderate — strength depends on scoop size
Preparation Effort
Hands-on process
Minimal effort
In Summary:Traditional Kava offers a more authentic, hands-on preparation experience, while instant Kava is designed for speed and convenience. The right choice depends on how much time you have and how much control you want over the final drink.
How To Store Prepared Kava
Once you prepare Kava using your chosen method for how to make Kava, store it in an airtight glass container in the refrigerator for up to 3–5 days. It will help maintain freshness and consistency.
Use a mason jar or sealed glass bottle to limit air exposure.
Refrigerate promptly; do not leave it at room temperature.
For best quality, drink within 1–2 days.
Shake before pouring, as sediment settles at the bottom.
Discard if it smells sour or looks unusual.
Pro Tip:Store prepared Kava in smaller portions rather than in a single large container. This reduces the amount of air exposure each time you open it and helps keep the remaining Kava fresher for longer.
Common Mistakes To Avoid When Making Kava
If you’re looking for the best way to make Kava, avoid these common mistakes:
Avoid using hot or boiling water: High heat can affect the drink’s quality. Stick with cool or lukewarm water instead.
Not straining properly (for traditional Kava): Rushing the straining step can leave gritty root fibers in your cup. Knead thoroughly and use a proper strainer bag.
Using low-quality Kava: Poorly sourced or old Kava powder can result in a weak, unpleasant drink. Start with fresh, well-processed Kava.
Drinking too quickly: Traditional Kava is meant to be sipped steadily, not rushed. Take your time.
Kava typically takes effect within 15–30 minutes after drinking. The timing can vary depending on the preparation method and whether you’ve eaten beforehand.
Disclaimer: Effects and duration may vary based on serving size, individual metabolism, body weight, and overall health.
2. What does Kava taste like?
Kava has an earthy, slightly bitter flavor with a mild peppery finish. The texture is often described as cloudy or somewhat gritty in traditional preparations.
You can mix Kava with coconut milk or almond milk to soften the bitterness. Serving it chilled or adding a small amount of natural sweetener can also improve the flavor.
4. Can you make Kava without a strainer bag?
No, a proper strainer bag is recommended for traditional preparation. Without one, fine root particles may remain in the drink.
5. How much Kava powder should I use per serving?
A common starting point is about 1–2 tablespoons of medium-grind Kava per cup of water. You can adjust gradually based on your preference.
6. Can you mix Kava with juice instead of water?
Yes, some people mix Kava with juice to change the flavor. Make sure it’s blended well for consistent results.
7. Should Kava be taken on an empty stomach?
Many people prefer it that way, as food can affect how it’s felt. However, individual preference varies.
8. Can you reuse the kava root after kneading it once?
Yes, some people perform a second rinse in fresh water. The second batch is usually lighter in strength than the first.
9. Is instant Kava as strong as traditional Kava?
It depends on the product and serving size. Instant Kava is designed for convenience, while traditional preparation allows more control over strength.
Disclaimer: Kava may affect individuals differently. Use responsibly and seek professional medical guidance if you are unsure whether it is appropriate for you.